syque.com

The Psychology of Quality and More

| Menu | Books | Share | Search | Settings |

A Toolbook for Quality Improvement and Problem Solving (contents)

Relations Diagram: How to do it

The Quality Toolbook > Relations Diagram > How to do it

When to use it | How to understand it | Example | How to do it | Practical variations


<-- Previous | Next -->


How to do it

  1. Form a team of between four and seven people to work on the problem. The ideal team has a close working knowledge of the problem area (to be able to identify why things happen) and between them can cover all potential topics.

  2. Identify the type of relationship to be mapped, and how this is to be displayed. A useful way of doing this is to identify a simple question which, when answered, will enable related items to be identified. For example, 'What must be done before this item?'. Encourage a common approach in the meeting by displaying this question clearly.
  3. The most common Relations Diagram is a map of the interrelationship between the causes of one or more problems, in which case the question is, 'What directly causes this item?'. Some other possible relationships are discussed under Practical Variations.


  4. Define each problem clearly, writing it as a complete, but brief, sentence on a 3" x 5" card. This may come from a key issue identified through the use of another tool. There may be more than one such problem statement.
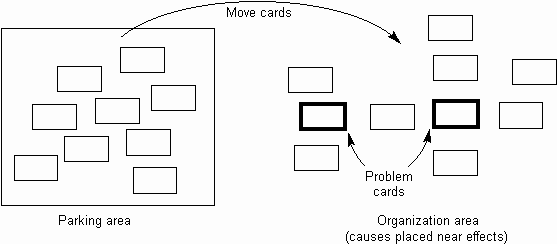
  5. Mark the problem cards to differentiate them from other cards, for example with a bold border.


  6. Produce the set of items to be related in the diagram. There are several approaches that may be taken here:
    • Use the identified relationship and question from step 2 with a Brainstorming or Nominal Group Technique session.
    • Use items that have been already generated from other tools, such as an Affinity Diagram, Cause-Effect Diagram or Tree Diagram.
    • Data can also be collected in other ways, such as with Surveys. Where data represents what someone has said, retain the exact wording so that the associated feeling is not lost.


    Write each item on a 3" x 5" card, distinguishing item cards from problem cards, for example by writing problem cards with heavier printing or adding a box around the text. Aim for around 15 to 50 cards. Less may indicate a problem which may not benefit from using this tool, whilst more becomes difficult to handle.


  7. If Brainstorming was used in step 4, then put the item cards randomly in a 'parking area' where they may be transferred to the main 'organization area'. If other methods were used, then they may already be in an order which is worth keeping (such as Affinity groups).
  8. Putting cards into a random order before selecting them destroys any prior patterns and encourages more creative and original thought when reorganizing them in step 7.


  9. Determine where to place the problem description card(s) from step 3 in the organization area. This should give sufficient space for the other cards to be placed in step 7.
  10. Thus, if there is one problem and many apparent interrelationships between item cards, place the problem card centrally. If it looks like there are long chains of relationships, with some being remotely connected with the problem, put the problem card on the right. If there are multiple problems with many shared item cards, space the problem cards out around the edge of the area.

    The organization area needs to be large enough to easily contain all cards, spaced out sufficiently to draw in arrows between them (in step 9).


  11. Select a card in the organization area and look for a card in the parking area which answers the question identified in step 2. For a cause-effect Relations Diagram this will be a card which is a direct cause of a problem card.
  12. Move this to the organization area, as in the diagram below, placing it near the appropriate problem card, leaving space to draw an arrow between the two cards (do not draw any arrows now, as cards may be moved). This may require some discussion, but avoid lengthy argument as this may make the session overly long.

    Repeat this step, selecting and placing cards near the problem cards, until all cards with a direct relationship have been moved.


    Fig. 1. Moving cards to form diagram


  13. For each card laid in step 7, repeat the process of searching for cards in the parking area that are directly related to it, then placing this new card nearby. When placing cards, also look for links to or from other cards in the organization area and position the card accordingly.
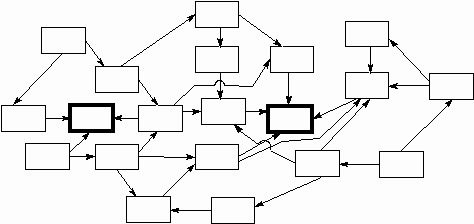
  14. You may have to pause occasionally to move cards on the organization area, to make space for new cards or show newly discovered relationships. In these cases, be careful to preserve the relative positioning of cards.

    During this process, additional new cards may be written as new relationships are noticed.


  15. Review the layout with the team and use the question from step 2 to help draw arrows between cards on the diagram as relationships are agreed. Draw the arrows going from causes to effects. Avoid confusion where lines cross by using a 'hump-back' bridge.
  16. Beware of adding arrows for weak relationships, as this can result in the important link being hidden in a mass of arrows. If in doubt, draw in the main links first, and only add lesser links as long as the diagram remains intelligible. Also avoid two-way arrows; where the relationship is bidirectional, place the arrowhead to show the most significant direction.


    Fig. 2. Adding arrows to show relationships


  17. Identify and mark key items that are to be addressed further, such as with shading or emboldening. For example, when using a cause-effect Relations Diagram, actions might include:
    • Addressing cause cards with most arrows entering and leaving them may be an easy way to have significant effect.
    • Addressing causes with arrows leaving them may contribute to resolving a number of subsequent causes.
    • Addressing causes that have multiple arrows entering them may unblock bottlenecks.
    • Addressing causes that have no arrows entering them may fix root causes.


  18. Treat this diagram as a first draft. Check that assumed causes are actual causes. Review it for other changes, marking up changes on the copies.
  19. If the diagram may be read by people who do not understand the symbols, add a key.


  20. Review the marked changes, update the document accordingly and repeat the review as necessary. Plan and implement concrete actions to address key items.


<-- Previous | Next -->

Site Menu

| Home | Top | Settings |

Quality: | Quality Toolbook | Tools of the Trade | Improvement Encyclopedia | Quality Articles | Being Creative | Being Persuasive |

And: | C Style (Book) | Stories | Articles | Bookstore | My Photos | About | Contact |

Settings: | Computer layout | Mobile layout | Small font | Medium font | Large font | Translate |


You can buy books here

More Kindle books:

And the big
paperback book


Look inside


Please help and share:


| Home | Top | Menu |

© Changing Works 2002-
Massive Content -- Maximum Speed